Thursday, April 23, 2020

Another Paint Update: 4/21/20


PROJECT 51: Another paint update. (Just four days later!) As promised, Brandon continues to send me progress photos as my MG parts move through the bodywork and paint process.
The mottled look on the parts is called a "guide coat," and is a very thin layer (almost a sprinkling) of dark paint over a lighter primer. The parts will then be lightly sanded and any areas that still show the guide-coat color are low spots that need to be addressed using spot putty or a high-build primer. These steps are especially important when a car's final color will be dark, like the British Racing Green that I've chosen.
This type of professionalism and attention to detail are things that you would expect from a "custom paint shop" (that would take months to paint your car) and speaks volumes about the team that Brandon has at the Mesa Maaco.
Looking forward to seeing the color on all the parts!


Paint Update: 4/17/20


PROJECT 51: Paint update. I am more confident in my decision to go to Maaco for my paint all the time! Not only are they actually working on my parts like they said they would, but Brandon Baker, the sales manager, is sending me periodic photos to use in my documentation. On top of that, the work looks great! Thoroughly impressed, so far!


Front Suspension and Brakes

PROJECT 51: Front suspension and brakes. As I mentioned earlier, there is strong evidence that the front suspension of the MG had been worked on in the past … and that Brutus had done the work.
When the MG "T-series" went from the TC to the TD, one of the many things that got upgraded was the front suspension. The TC had a solid front axle (like a Model-T Ford), which was changed to independent, coil-spring suspension for the TD. It makes for a much smoother ride and far better handling. It is also equipped with rack-and-pinion steering, as opposed to the TC's lever-and-tie-rod arrangement. One of the unusual things in the new suspension is that the shock absorber IS the upper A-arm.
Although neither of the coil springs was broken, one was a little deformed, and they were not equal heights, so I decided to replace them. When compared to the new ones, it turns out they had fatigued and compressed somewhat over the years. (I know the feeling!)
I was able to make use of my yard-sale pullers, once again, to get the brake drums off the spindles, and the bearings out of the drums. I have all new bearings to put back in (as any sane restorer would do), but those that I took out were in pretty good shape. Because the set from the right wheel had part numbers etched into them, and the left did not, I suspect that the rights had been replaced, and the lefts may be original (or replaced at a different time). Unlike most modern cars that use tapered roller-bearings, the MG uses caged ball-bearings.
One of the "Brutus was here!" signs was that the bearings and the entire hubs were packed chock full of grease. This is one of those "If a little is good, a lot must be better," misconceptions. The only grease that helps the bearings is what is inside the races and in contact with the balls or rollers. The fallacy seems to be that if the bearing gets hot and the grease melts out, the fresh grease will flow in to take its place and save the bearing. The reality is that if the bearing gets so hot that it melts (actually burns) the hi-temp bearing grease you are about thirty seconds away from a seized and spun bearing. And the adjacent grease is going to stay right where you packed it. In fact, it actually prevents some of the heat in the normal-running bearing from dissipating.
The brake shoes still had a good deal of lining material, and I suspect they were fairly new when the car went into its 17-year storage. They had a lot of surface rust, but that could be easily sandblasted away, and they almost looked like they could be reused. That is until one of the linings fell off in my hand!
After cleaning and sandblasting the brake drums, I discovered that what I thought (hoped) was mild surface rust on the inside braking surfaces was, in fact, deep-rooted Washington State corrosion. (Which I believe is also the state flower; I know it grows everywhere up there!) The pitting that the corrosion left behind was far too deep for sanding out, as I had hoped, so all four drums went out to AZ Brake & Clutch to be turned. At $17 each, another no-brainer!
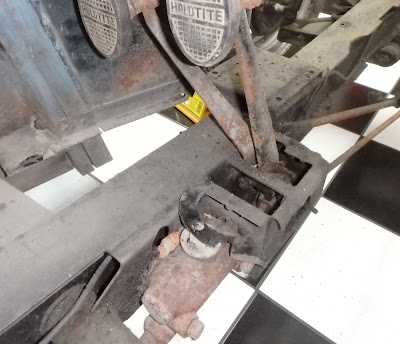
The wheel cylinders were badly corroded, and I doubt that they would have pushed the brake shoes, but I have six new cylinders (more gifts from Santa) ready to install. Each front wheel gets two cylinders.

I'm in the process of cleaning, sandblasting, and painting all of the parts, and will hopefully have everything ready to start reassembling when the frame comes back from powder-coating in a week or so.

The TD's "Better Idea" independent front
suspension with rack and pinion steering.

Old vs. New front springs.

Shock absorber/upper A-arm is at right.
Not the steel brake line connecting the two
wheel cylinders.

Old yard-sale friend pressed into service
again to pull the drums.

Friend number-2 pulling the outer wheel bearing.

New caged ball bearing.

"Brutus was here!" glob of grease scooped
out of bearing spindle.

Rusty brake shoes and corroded
wheel cylinders.

More than skin-deep rust requiring
that the drums be turned.

Lining delaminated from the steel shoe.

Old and New wheel cylinders.
At right are the rear wheel cylinders
with the emergency-brake lever.


Thursday, April 16, 2020

Master Brake Cylinder


PROJECT 51: Master brake cylinder. To be filed under "Hope springs eternal," shortly after I bought the MG, back in late October of last year, I added a "Master Cylinder Rebuild Kit" to my Christmas list (along with many other MG items), and Santa didn't disappoint me.
The master cylinder is the small hydraulic pump that is connected to the brake pedal that forces the brake fluid through all of the steel lines out to the wheel cylinders to expand the brake shoes against the drums to make the car stop … so it's kind of important that it works right.
I finally got around to cleaning and disassembling the master cylinder assembly, and based on what I've learned about the REAL condition of the car since those early optimistic (blissfully naïve) days, I wasn't the least bit surprised to find that Santa had wasted the precious room in his sleigh on THAT gift.
My first clue that something might be wrong was when I had to extract the pushrod with a pair of Vice Grips. That part should normally just fall out when its rubber dust boot is removed. The rusty brake fluid that ran out when I removed the piston pretty much told me the rest of the story.
Although not as bad as I thought it would be, the cylinder bore had several spots of deep rust pitting.
When the brake pedal is pressed and the rubber piston seal passes over one of those pitted areas, the brake fluid leaks behind the seal, rather than getting pumped out to the brakes, causing a "soft pedal." That's if you're lucky. If the pitting and leakage is bad enough, the pedal goes right to the floor, and your life begins to flash in front of your eyes. (Been there; seen that; changed underwear!)
A complete new master cylinder is on its way. There will still be plenty of other things for Santa to bring me later on.


Master cylinder still in car.

Rusty brake fluid is not a good sign!

Brown crescents inside bore are rust pits.

On its way, now. Can't wait for Santa.

Sunday, April 12, 2020

Carburetors


PROJECT 51: Carburetors. The MG (and many other British sports cars of the period) used a pair of side-draft carburetors made by SU. They were (and are) notoriously finicky to get set up and balanced, and to the American mind, are far more complex than a carburetor needs to be. There are aftermarket kits that replace them with a "normal" downdraft carb, but obviously, I can't go there. So, I am rebuilding the 69-year-old originals.
Over time (especially when the car isn't even started for many years) the seals and gaskets dry out and crack, but there aren't too many moving parts to wear out. The major wear items are the fuel-metering needle and the throttle-plate shaft.
The metering needle is a long, small diameter pin that is slightly tapered from one end to the other. It fits inside a jet body with a hole that is only a tiny bit larger than the big end of the pin. This is where the fuel is "metered" into the intake air. The farther the tapered pin is drawn out of the jet, the more fuel is delivered.
Surprisingly, the pins and jets in my carbs had been adjusted properly and showed almost no signs of wear. But since the rebuild kits came with new jets, I decided to replace the old needles, as well. The "universal" kit does not come with needles because there are "standard," "lean," and "rich" versions to choose from.
The throttle-plate shafts were a different story. Both the shafts and the holes in the throttle bodies in which they turn showed plenty of wear! There is supposed to be about .001" of clearance between the shaft and the hole; mine had more than .008". That creates a leak-path for air that makes setting a smooth idle almost impossible.
The kits come with new shafts and a set of bushings to make the holes the right size. Installing the bushings requires machining both sides of the throttle body castings (you can't do both from one side), and while I was figuring out how I was going to fixture the parts in my mill to get both bushings perfectly in line, I did some Internet searching to see what others might have come up with.
Several times I saw the name "Bob Johnson in Claremore, OK" pop up as being THE guy to send your SU carbs to if you wanted them rebuilt. I e-mailed him and asked what he would charge to just install the bushings. He replied $50 total for two bushings in both bodies. No brainer! The bodies and bushings were in the mail the next morning.
While waiting for those parts to come back, I cleaned and polished the rest of the components, and I also sent the exhaust manifold out to be ceramic coated. It should never rust or discolor, again.
The assembly of the carbs is intricate and a bit complicated, and the instructions that came with the rebuild kits are not the best I've ever seen. Because the kits will service several different models of SU carbs, there are some extra washers and gaskets … and they don't bother to tell you that. There is also an illustration that shows a "piston return spring" that was missing from both of my carbs. While cursing Brutus, yet again, I did some digging on the Internet, and I found that that spring wasn't used in the early TD carbs. (While Brutus was blameless for the spring, he did manage to lose some of the original screws and replaced them with whatever he could find.)
Between the rebuild-kit instructions, the photos that I took during disassembly, and some better cut-away and exploded views from the Internet, I was able fit all the puzzle pieces back together to factory specs.
I mounted the finished carbs and the air-cleaner to the engine for photos, but they will come back off before the engine gets mounted in the frame, to make sure they don't get damaged.

Before the engine removed from the car.

I took plenty of before photos.

Before and after polishing.

Rebuild kits and the carb parts. (Throttle bodies are at the shop.)

After with ceramic-coated exhaust manifold.

Shown with the restored air cleaner.


Friday, April 10, 2020

Off to Paint

PROJECT 51: Off to paint. I finally have the major body parts off to the paint shop. Or, more correctly, "another" paint shop.
Most body and paint shops are set up to work on whole cars, so when I approached them with the idea of bringing in all the separate body parts most of them were scared off. One shop I found was interested and quoted me a fair price, but when I visited, I found out that they didn't have a paint booth; they painted outside "on calm days"! (I can only imagine what the neighbors' cars look like from the drifting overspray!)
Another wanted to "take it to the next level" with a concourse-quality paint job at a price that would have exceeded the entire cost of the restoration, including purchasing the car to begin with.
I finally found a shop that would take my parts a few at a time, and fit them in between their regular collision-repair jobs, and at a reasonable price. I dropped off the fenders, doors, and running boards to get started. Two months later, no progress had been made, and I talked with the owner about getting a schedule. He told me that they were too busy with their collision work, which needed to be turned around quickly, and that it might be six months or more before he could get to my stuff. (I'm not sure how he knew that they wouldn't STILL be too busy in six months.) I decided to keep looking, and when I went to pick up the parts, I found them sitting outdoors on a rack with a dozen other piece-parts, some of which looked like they had been there a lot longer than two months. (I didn't bother to ask the owner if he had an uncle or something named Brutus.)
I asked some of the local car guys and gals for recommendations in the area, and was surprised at a name that came up more than once. A Maaco shop in Mesa.
I'm aware that some of you have just had a shiver run down your spine, but when I went out to talk with them, look at their shop, and at what they were putting out the door, I was more impressed than with Brutus' nephew's place. They were organized, well-staffed, and the quality of their work seemed first rate. They weren't deterred by my body-parts requirement, gave me a reasonable estimate based on photos of the parts, and even gave me a turn-around time in weeks, not months.
Bear in mind that I'm looking for a "driver" paint job; one that is more akin to the car's factory finish than something you'd see on the grass at Pebble Beach. If (when) I get a rock chip while out cruising, I'm going to fix it with a tiny dab of paint in the divot; I'm not going to refinish the whole fender.
Now that they have the parts and have seen the spots that will require a little filler here and there, they are going to give me a revised estimate, which is only fair. If it were to double (which I don't expect) it would still be less than a third of Mr. Next-Level's price.
While the body is in paint, and the frame is at media-blasting / powder-coat, I will work on the front and rear suspension and brake assemblies.

I am already getting progress photos from the manager at Maaco! What a difference from the other guys!


Inventory of parts to be painted.
I kept a number of the small parts back that I will paint myself.

The body tub fits perfectly in the truck.

Already making progress!


Thursday, April 9, 2020

Bare Bones


PROJECT 51: Bare bones. It only took a day to get all of the suspension and brake parts off of the frame once the body tub was removed. All of the moving parts in the front end were surprisingly tight for a 69-year-old car, so I suspect it was rebuilt sometime in the not-to-distant past. One indicator that Brutus or one of his kin had been there before me was that of the four bolts that hold the rack-and-pinion steering assembly to the frame, two were British Whitworth size, and the other two were American inch size.
In a nod to before we were married, my wife, Diane, tackled the dirty job of scraping the heavy grease off the frame while I disassembled. Back in 1973-74 I did this same level of body-off restoration on a 1946 CJ2A Jeep (which I wish I had kept!) and then-girlfriend Diane helped me the same way.
The stripped frame, the wheels, and a couple of other components are now at ProStrip for media-blasting and powder-coating. There is not too much left to disassemble … but a lot to clean and paint.


Stripped bare and heading for media-blast and powder-coating.

Other items going to media-blast.

Good help is hard to find! My wife, Diane, helping with the dirty work.

So, when you find it, you keep it! My then-girlfriend, Diane in 1974
helping with the dirty work on a Jeep restoration.

1946 CJ2A before.

About nine months later.

Not much left to take apart.

Sunday, April 5, 2020

Engine nearly complete.


PROJECT 51: Engine nearly complete. I'm waiting for the exhaust manifold to come back from being ceramic coated, and for some carburetors parts, but aside from those few items, I finally have the engine pretty well assembled.
All of the gaskets were sealed on both sides with high-temp silicone, and the original-style two-piece front crankshaft seal was replaced with a modern one-piece lip seal. This engine should be more free from oil-leaks than the original engineers at MG ever dreamt possible!
In my humble opinion, I believe the MG engine is kind of pretty when it's all cleaned up.


Engine as removed from the car.

Original design two-piece oil seal vs. modern lip seal.
The originals are basically braided rope impregnated
with graphite. The question was never "if" but
"when" they would start leaking.

Bead of silicone sealant on oil pan gasket.
Lip seal is at far left, between the pulley. and the timing chain.

Almost a work of art!

Scuttle Ramp


PROJECT 51: Scuttle Ramp. The bottom third of the firewall on the MG is referred to as the "scuttle ramp." The scuttle of a car is known in America as the cowl, and is the body panel directly under the windshield. Over time, it has come to include the firewall. The scuttle ramp is a separate section of the firewall, angled upward (hence "ramp"), is located right behind the engine block, and has a semicircular opening that fits closely around the bell housing.
When Brutus removed the engine and gearbox from the car he obviously had a great deal of difficulty (See the post about the broken mounting flange on the gearbox and the bent up mounting bracket from 12/11/19). While trying to force the engine/gearbox free, he lifted the pair so high (and so hard!) that he bent the bejeebers out of the edges of the scuttle ramp. He even managed to put a split in the sheet-steel panel!
Over the past several weeks, while waiting for engine parts to come back from the shops, I used the time to get the scuttle ramp back into a more presentable condition.
After degreasing it, I set about straightening and flattening all of the damage that included various dents of unknown origin. First, I used my drill press as an arbor press, and using a 4x4 and a 2x4 I was able to get some of the end-to-end bend out while preserving the crease along the top that is supposed to be there.
I got the rest of the bend out by clamping the top edge of the scuttle between 2x4s in my bench vice, and used a wide pry-bar to lift and bend the metal back into alignment.
I then went to work with a body-work hammer to flatten the dents. Finally, I used a modified pair of Vice-Grips to straighten the curled edges.
I welded the split, after which I used my trusty lead filler to level the area. Spot putty was used over the lead and in several dents to get a smoother surface.
The final step was sandblasting, priming, and painting, and now it's ready to reinstall … sometime in the future.


As removed from the car.
The circular section should be lying flat.

Using my drill press as an arbor press
to flatten part of the bend,

Lifting more of the bends into line with a pry-bar.

Tapping out some of the miscellaneous dents.

Split in the sheet steel panel.

Split held in alignment by a small bar
clamped to the underside.

Spot putty to fill some of the dents.

Modified wide-grip Vice-Grips used to flatten some of the curled edges.

Primed and painted and waiting for installation ,,, sometime in the future.