Monday, May 11, 2020

Bringing Up The Rear - Part-2

PROJECT 51: Bringing up the rear: Part-2. Apparently, Brutus had replaced the wheel bearings when he had the rear axle apart, but he seems to have used a chisel to get them off the axle shafts, beating a furrow between the axle flange and the bearing spacer. I will replace the bearings (and fix the spacers), yet again, but I was able to use my much-more-civilized yard-sale bearing puller to get them off this time.
After getting the spring-packs off the axle, I noticed that the u-bolts had worn a groove into the axle tube. This is apparently so common that they sell a steel half-sleeve to fix it. After cleaning, the grooves were filled with high-compressive-strength epoxy filler, and the sleeves were clamped in place while it cured.
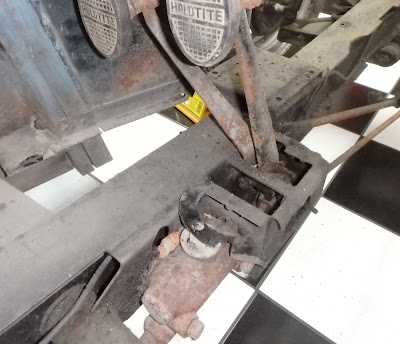
Unlike most other rear-wheel-drive cars from which the differential carrier-bearing unit can be removed while the axle is still in the car, the TD's axle must be fully removed, and broken in two to get at the internals. (Apparently, the "better idea" team that designed the front end didn't associate with the group who engineered the rear end.)
It required two chains, a length of 2x4, and a hydraulic jack to break the bond of the twenty square inches of gasket surface and the sealant that Brutus had used.
When I removed the pinion shaft from the carrier housing it was the very last part of the entire MG that could be taken apart. Something of a milestone! I can only put things back together from here.
The pinion oil seal was not leaking, but I would naturally replace it, anyway. It became obvious that Brutus had replaced it, as well, because there were gouges in the seal's press-fit bore where he had used a screwdriver and hammer to dig out the old one. Fortunately, they could be filed smooth.
I had previously disassembled the spring packs and wire-brushed the rust off of them, and now they were hung on a rack and painted with urethane rust-stop paint, as were both halves of the axle.
There are still a few more parts that need to be cleaned and painted, but for the most part, it's all assembly now!
Brutus method of bearing removal.


Grooves worn in axle tube.

Groove fix.

Breaking the seal of the axle-housing halves.

The last part that could be removed from the car!

Brutus method of seal removal.

Rear spring pack.

Rubber bushings from spring pack.

Rack-o-springs to be painted.

Painted spring leaves.

Painted axle tube halves.

Bringing Up The Rear - Part-1

PROJECT 51: Bringing up the rear: Part-1. The last major component that I needed to take apart on the car was the rear axle assembly. The first order of business was to remove the 1 1/4-inch nuts on the ends of the two axle halves so the brake drums could be removed.
(Let me mention here that when I finished off the engine I believed that I would begin to see less and less of Brutus' handiwork. I assumed (hoped!) that he had just rebuilt the engine and maybe done some maintenance here and there. Nope! His unmistakable fingerprints are embedded everywhere!)
My first "Brutus was here!" clue was that there were two different nuts on the ends of the axles, and one had the cotter pin while the other did not.
I think both Brutus and Washington state need to share the blame for how hard the nuts were to remove, but it became a team effort. First I tried a 1/2-inch-drive socket and 14-inch breaker bar. When that failed, I added a two-foot extension to the breaker. Eventually I had a FIVE-foot extension on the breaker, but at that point, the entire axle lifted off the floor and still the nuts would not budge. Enter new son-in-law Noah.
While Noah stood on the axle to hold it down, I leaned on the extension with virtually all of my weight. In the photo you can see him shielding his face against the very real possibility of the socket exploding. The bar was bending, but the nut refused to move. Next, I heated the nut with my propane torch, but still nothing. Finally, I hauled out the big guns and blasted the nut with my acetylene torch until it was almost glowing. That did the trick, but it still took a fair amount of effort on the five-foot bar to break the nut free.
With a wire brush and a triangular file I was able to clean up the axle threads, and I bought two new (matching!) nuts.
Rear axle assembly ready for disassembly.


Left nut.

Right nut.

Not enough torque with a breaker bar.

Still not enough torque with a five-foot extension.

The "big gun" acetylene torch.

Old and new nuts.

Sunday, May 10, 2020

Reassembly is Nigh!

PROJECT 51: Reassembly is nigh! Last week I got the frame, the wheels, and assorted other parts back from media-blasting and powder-coat. Yesterday, I got all the body parts back from paint, and they look awesome!
Maaco is one of very few suppliers I've dealt with on this project that has delivered when they said they would. Brandon told me it would be "about three weeks," and he called me to come get the parts three weeks and one day later. The bodywork that they did is beautiful, and the color is exactly what I wanted. After the car is assembled, I'm going to bring it back to them and they are going to color-sand and buff the body as a whole.
Because I'm not quite ready to start putting body panels on the frame, I had to store all the parts somewhere where they wouldn't get damaged. Did you know that you can fit all the parts for an MG TD body in your living room? (That was actually my wife, Diane's, idea, not mine, bless her heart!)

Newly powder-coated frame  waiting
for parts to be attached.
Powder-coated wheels.


A TD in the living room.

Thursday, April 23, 2020

Another Paint Update: 4/21/20


PROJECT 51: Another paint update. (Just four days later!) As promised, Brandon continues to send me progress photos as my MG parts move through the bodywork and paint process.
The mottled look on the parts is called a "guide coat," and is a very thin layer (almost a sprinkling) of dark paint over a lighter primer. The parts will then be lightly sanded and any areas that still show the guide-coat color are low spots that need to be addressed using spot putty or a high-build primer. These steps are especially important when a car's final color will be dark, like the British Racing Green that I've chosen.
This type of professionalism and attention to detail are things that you would expect from a "custom paint shop" (that would take months to paint your car) and speaks volumes about the team that Brandon has at the Mesa Maaco.
Looking forward to seeing the color on all the parts!


Paint Update: 4/17/20


PROJECT 51: Paint update. I am more confident in my decision to go to Maaco for my paint all the time! Not only are they actually working on my parts like they said they would, but Brandon Baker, the sales manager, is sending me periodic photos to use in my documentation. On top of that, the work looks great! Thoroughly impressed, so far!


Front Suspension and Brakes

PROJECT 51: Front suspension and brakes. As I mentioned earlier, there is strong evidence that the front suspension of the MG had been worked on in the past … and that Brutus had done the work.
When the MG "T-series" went from the TC to the TD, one of the many things that got upgraded was the front suspension. The TC had a solid front axle (like a Model-T Ford), which was changed to independent, coil-spring suspension for the TD. It makes for a much smoother ride and far better handling. It is also equipped with rack-and-pinion steering, as opposed to the TC's lever-and-tie-rod arrangement. One of the unusual things in the new suspension is that the shock absorber IS the upper A-arm.
Although neither of the coil springs was broken, one was a little deformed, and they were not equal heights, so I decided to replace them. When compared to the new ones, it turns out they had fatigued and compressed somewhat over the years. (I know the feeling!)
I was able to make use of my yard-sale pullers, once again, to get the brake drums off the spindles, and the bearings out of the drums. I have all new bearings to put back in (as any sane restorer would do), but those that I took out were in pretty good shape. Because the set from the right wheel had part numbers etched into them, and the left did not, I suspect that the rights had been replaced, and the lefts may be original (or replaced at a different time). Unlike most modern cars that use tapered roller-bearings, the MG uses caged ball-bearings.
One of the "Brutus was here!" signs was that the bearings and the entire hubs were packed chock full of grease. This is one of those "If a little is good, a lot must be better," misconceptions. The only grease that helps the bearings is what is inside the races and in contact with the balls or rollers. The fallacy seems to be that if the bearing gets hot and the grease melts out, the fresh grease will flow in to take its place and save the bearing. The reality is that if the bearing gets so hot that it melts (actually burns) the hi-temp bearing grease you are about thirty seconds away from a seized and spun bearing. And the adjacent grease is going to stay right where you packed it. In fact, it actually prevents some of the heat in the normal-running bearing from dissipating.
The brake shoes still had a good deal of lining material, and I suspect they were fairly new when the car went into its 17-year storage. They had a lot of surface rust, but that could be easily sandblasted away, and they almost looked like they could be reused. That is until one of the linings fell off in my hand!
After cleaning and sandblasting the brake drums, I discovered that what I thought (hoped) was mild surface rust on the inside braking surfaces was, in fact, deep-rooted Washington State corrosion. (Which I believe is also the state flower; I know it grows everywhere up there!) The pitting that the corrosion left behind was far too deep for sanding out, as I had hoped, so all four drums went out to AZ Brake & Clutch to be turned. At $17 each, another no-brainer!
The wheel cylinders were badly corroded, and I doubt that they would have pushed the brake shoes, but I have six new cylinders (more gifts from Santa) ready to install. Each front wheel gets two cylinders.

I'm in the process of cleaning, sandblasting, and painting all of the parts, and will hopefully have everything ready to start reassembling when the frame comes back from powder-coating in a week or so.

The TD's "Better Idea" independent front
suspension with rack and pinion steering.

Old vs. New front springs.

Shock absorber/upper A-arm is at right.
Not the steel brake line connecting the two
wheel cylinders.

Old yard-sale friend pressed into service
again to pull the drums.

Friend number-2 pulling the outer wheel bearing.

New caged ball bearing.

"Brutus was here!" glob of grease scooped
out of bearing spindle.

Rusty brake shoes and corroded
wheel cylinders.

More than skin-deep rust requiring
that the drums be turned.

Lining delaminated from the steel shoe.

Old and New wheel cylinders.
At right are the rear wheel cylinders
with the emergency-brake lever.


Thursday, April 16, 2020

Master Brake Cylinder


PROJECT 51: Master brake cylinder. To be filed under "Hope springs eternal," shortly after I bought the MG, back in late October of last year, I added a "Master Cylinder Rebuild Kit" to my Christmas list (along with many other MG items), and Santa didn't disappoint me.
The master cylinder is the small hydraulic pump that is connected to the brake pedal that forces the brake fluid through all of the steel lines out to the wheel cylinders to expand the brake shoes against the drums to make the car stop … so it's kind of important that it works right.
I finally got around to cleaning and disassembling the master cylinder assembly, and based on what I've learned about the REAL condition of the car since those early optimistic (blissfully naïve) days, I wasn't the least bit surprised to find that Santa had wasted the precious room in his sleigh on THAT gift.
My first clue that something might be wrong was when I had to extract the pushrod with a pair of Vice Grips. That part should normally just fall out when its rubber dust boot is removed. The rusty brake fluid that ran out when I removed the piston pretty much told me the rest of the story.
Although not as bad as I thought it would be, the cylinder bore had several spots of deep rust pitting.
When the brake pedal is pressed and the rubber piston seal passes over one of those pitted areas, the brake fluid leaks behind the seal, rather than getting pumped out to the brakes, causing a "soft pedal." That's if you're lucky. If the pitting and leakage is bad enough, the pedal goes right to the floor, and your life begins to flash in front of your eyes. (Been there; seen that; changed underwear!)
A complete new master cylinder is on its way. There will still be plenty of other things for Santa to bring me later on.


Master cylinder still in car.

Rusty brake fluid is not a good sign!

Brown crescents inside bore are rust pits.

On its way, now. Can't wait for Santa.